MySQL5.6.10 NoSQL API访问方式体验
MySQL 近期发布5.6的GA版本,其中确实有很多不错的特性值得关注和尝试。NoSQL API的支持就是其中一个比较不错的亮点,我们这就来尝试一下。详细的特性介绍可访问:http://dev.mysql.com/tech-resources/articles/mysql-5.6.html 。
从MySQL官网了解到,通过Memcache的API即可访问MySQL的NoSQL API。
Many of the latest generation of web, cloud, social and mobile applications require fast operations against simple Key/Value pairs. At the same time, they must retain the ability to run complex queries against the same data, as well as ensure the data is protected with ACID guarantees. With the new NoSQL API for InnoDB, developers have all the benefits of a transactional RDBMS, coupled with the performance capabilities of Key/Value store.
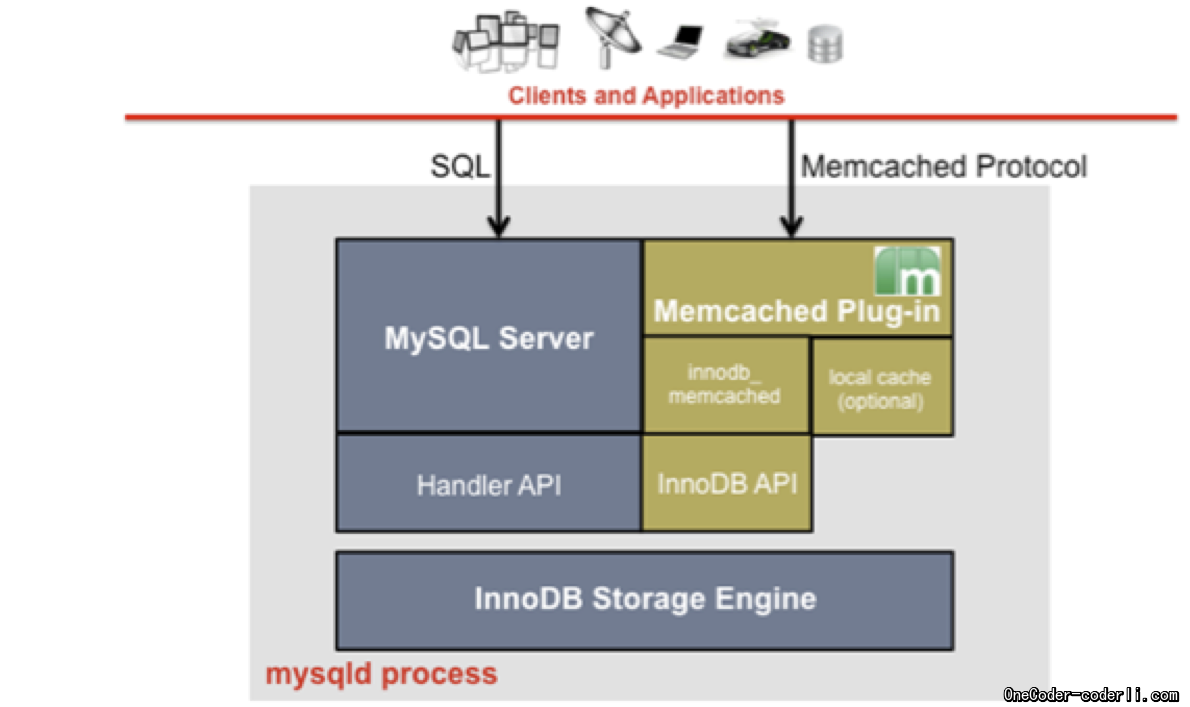
MySQL 5.6 provides simple, key-value interaction with InnoDB data via the familiar Memcached API. Implemented via a new Memcached daemon plug-in to mysqld, the new Memcached protocol is mapped directly to the native InnoDB API and enables developers to use existing Memcached clients to bypass the expense of query parsing and go directly to InnoDB data for lookups and transactional compliant updates. The API makes it possible to re-use standard Memcached libraries and clients, while extending Memcached functionality by integrating a persistent, crash-safe, transactional database back-end. The implementation is shown here:
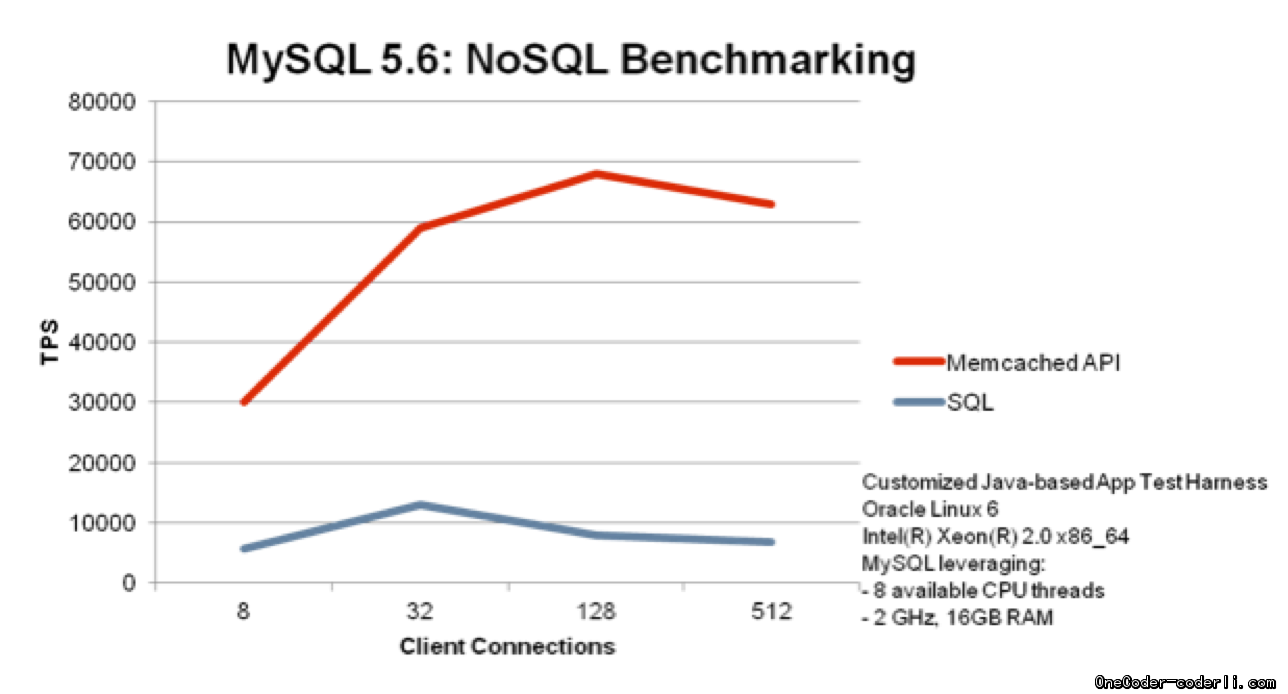
So does this option provide a performance benefit over SQL? Internal performance benchmarks using a customized Java application and test harness show some very promising results with a 9X improvement in overall throughput for SET/INSERT operations:
首先部署Server端的Memcache plugin集成环境。目前支持的系统为Linux, Solaris, and OS X,不支持windows。文档地址:http://dev.mysql.com/doc/refman/5.6/en/innodb-memcached-setup.html
由于我采用的tar包安装的MySQL,所以在安装memcache plugin的时候需要先安装libevent包。
yum install libevent
即可。
然后,安装libmemcached所需要的表
将插件设置成随服务启动而启动的守护插件
重启MySQL服务,安装完成。默认访问端口为11211。
下面来验证一下安装,简单的可以采用telnet的方式发送memcached命令
然后通过sql,在demo_test表中查询数据:
再通过Java代码操作一下,我们采用xmemcached作为client api。官方地址:https://code.google.com/p/xmemcached。Maven依赖:
1
2
3
4
5
<dependency >
      <groupId >com.googlecode.xmemcached</groupId >
      <artifactId >xmemcached</artifactId >
      <version >1.4.1</version >
</dependency >
代码如下:
1
2
3
4
5
6
7
8
9
10
11
12
13
14
15
16
17
18
19
20
 /**
      * @param args
      * @author lihzh(OneCoder)
      * @blog http://www.coderli.com
      * @throws MemcachedException
      * @throws InterruptedException
      * @throws TimeoutException
      * @throws IOException
      * @date 2013 -3 -12 下午12:07:41
      */
     public static void main(String[] args) throws TimeoutException, InterruptedException, MemcachedException, IOException {
           MemcachedClient client = new XMemcachedClient("10.4.44.208" , 11211);
            // store a value for one hour(synchronously).
           client.set( "key", 3600, "onecoder");
            // Retrieve a value.(synchronously).
           Object someObject = client.get( "key");
            // Retrieve a value.(synchronously),operation timeout two seconds.
           someObject = client.get( "key", 2000);
           System. out.println(someObject);
     }
通过mysql客户端查询记录,成功存入:
这里测试的仅仅最基本的功能,如果想使用该功能,还需要做好传统数据表与memcache表的映射关系。具体可参考:http://dev.mysql.com/doc/refman/5.6/en/innodb-memcached-developing.html。


